Alert SMS notification
After the threshold is triggered send alarm information and notify the recipient by SMS.
SMS Service Configuration
Only when you successfully configure your own SMS service will the alert SMS triggered within the monitoring system be sent correctly.
HertzBeat provides two ways to configure the SMS service: modifying the application.yml configuration file directly or configuring it through the HertzBeat frontend interface (Settings > Message Server Setting).
⚠️ Note: Only one method can be effective at a time. If both methods are configured and enabled, HertzBeat will prioritize the SMS service configured in the frontend interface.
Tencent Cloud SMS Configuration
Add/Fill in the following Tencent Cloud SMS server configuration to application.yml (replace parameters with your own SMS server configuration):
alerter:
  sms:
    enable: true     # Whether to enable
    type: tencent    # SMS provider type, supports "tencent"
    tencent:         # Tencent Cloud SMS configuration
      secret-id: AKIDbQ4VhdMr89wDedFrIcgU2PaaMvOuBCzY
      secret-key: PaXGl0ziY9UcWFjUyiFlCPMr77rLkJYlyA
      app-id: 1435441637
      sign-name: HertzBeat
      template-id: 1343434
-
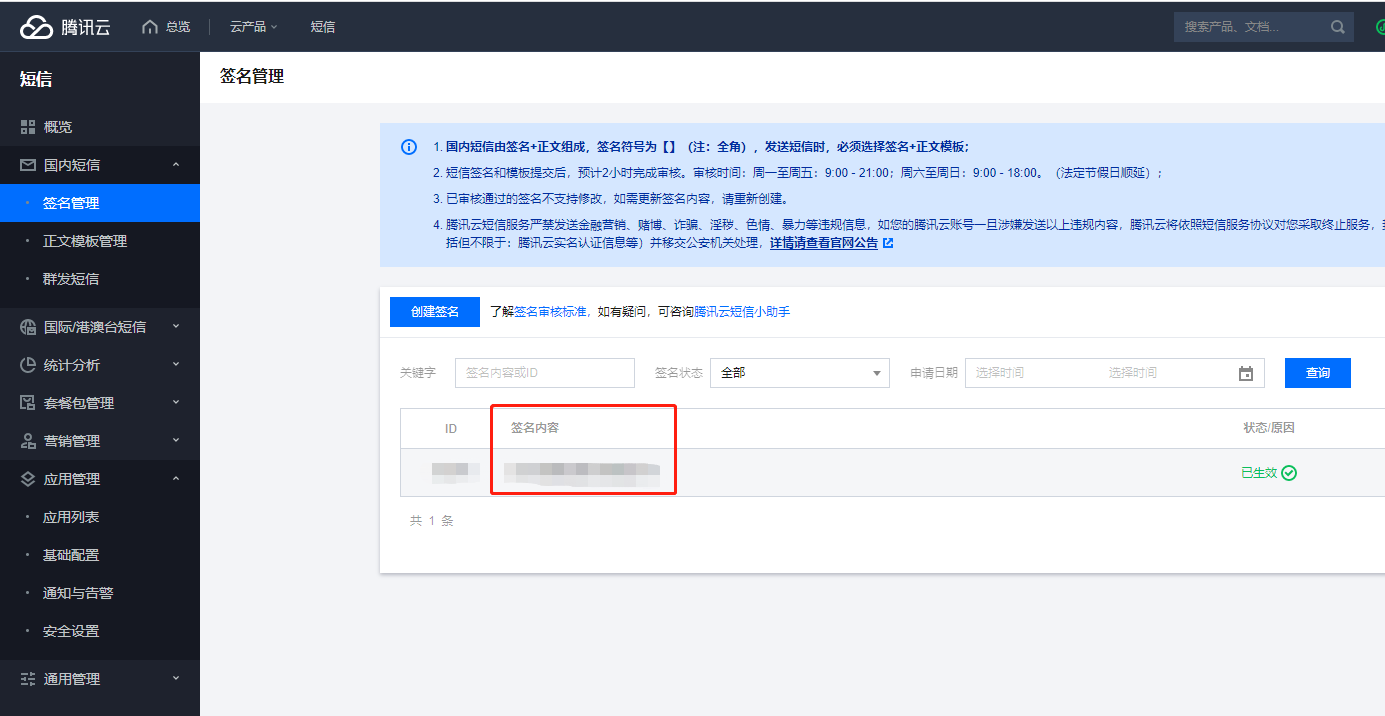
Create a signature (sign-name) in Tencent Cloud SMS

-
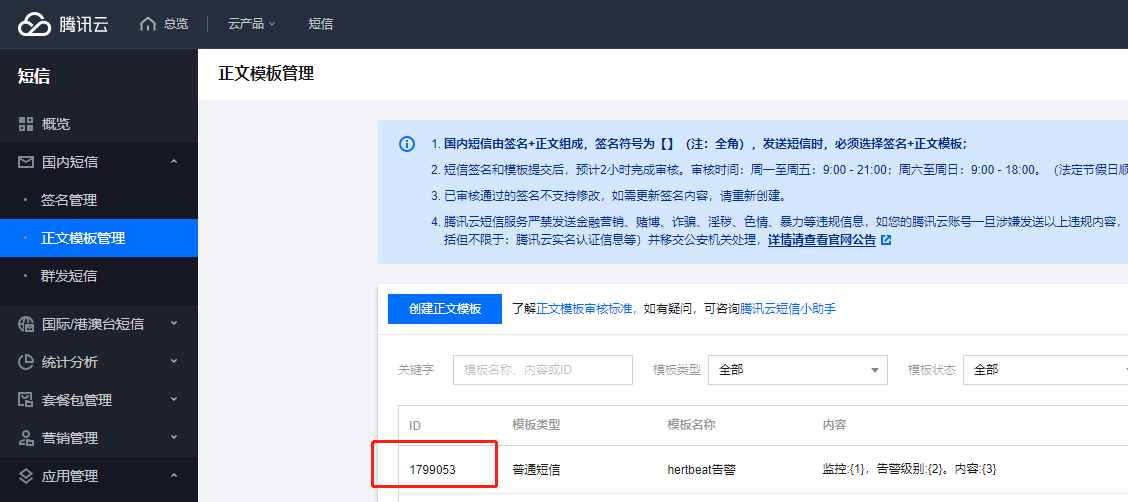
Create a message template (template-id) in Tencent Cloud SMS
Monitor: {1}, Alert Level: {2}. Content: {3}
-
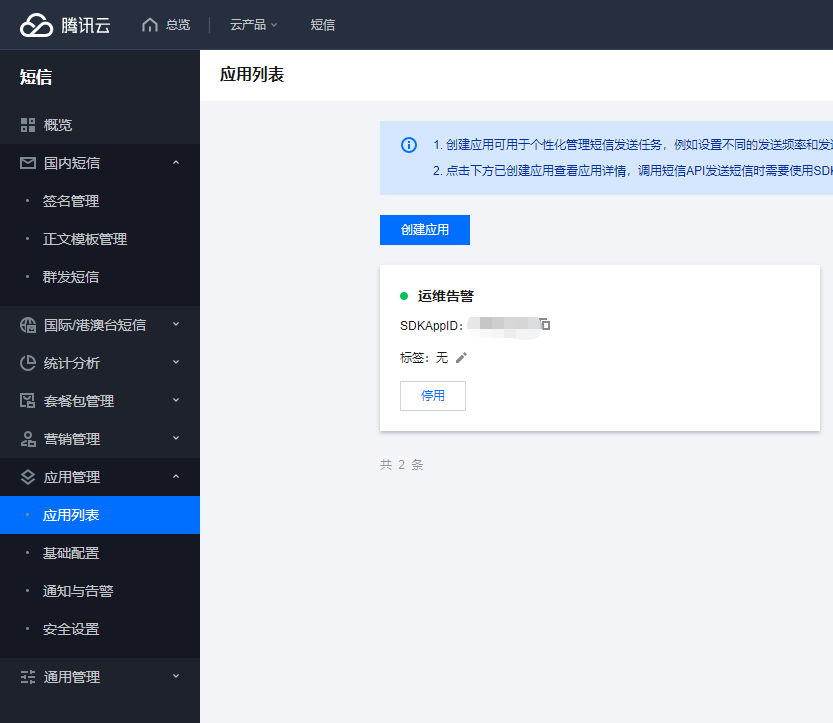
Create an application (app-id) in Tencent Cloud SMS

-
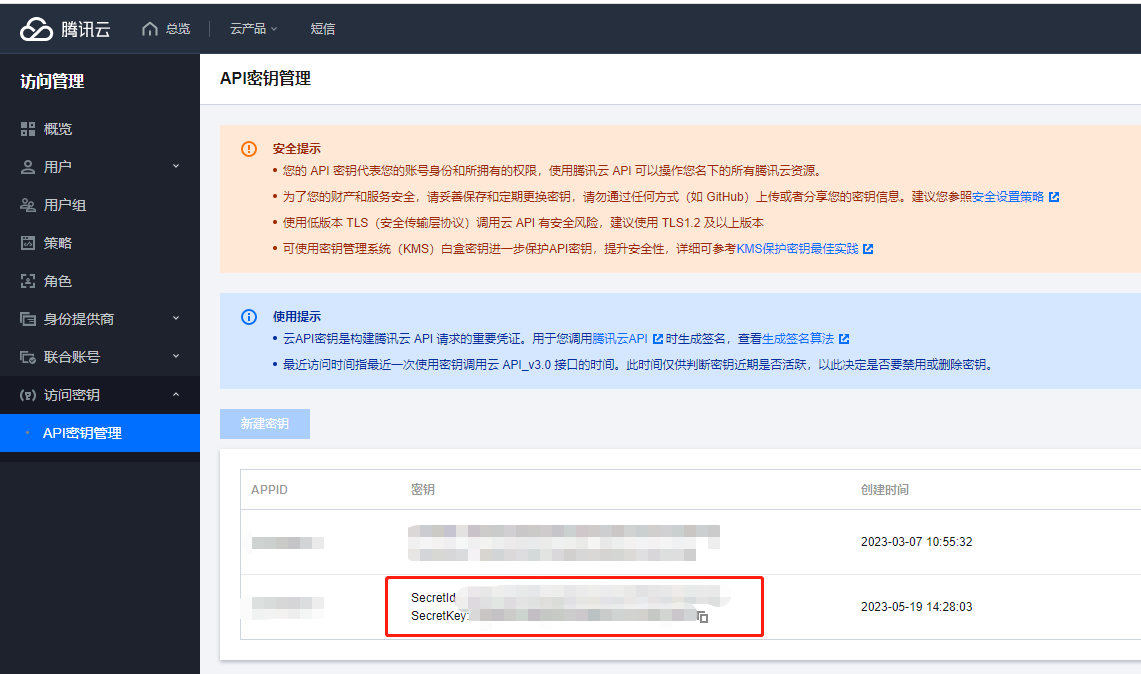
Obtain Tencent Cloud Access Management credentials (secret-id, secret-key)

Alibaba Cloud SMS Configuration
To activate and use Alibaba Cloud SMS service, you can refer to the official Alibaba Cloud documentation: SMS Getting Started Guide
You can configure the Alibaba Cloud SMS service either through the graphical interface or in the application.yml file.
To use application.yml, add/fill in the following Alibaba Cloud SMS configuration (replace parameters with your own SMS server configuration):
alerter:
   sms:
      enable: true    # Whether to enable
      type: alibaba   # SMS provider type, supports "alibaba"
      alibaba:        # Alibaba Cloud SMS configuration
         access-key-id:      # Your AccessKey ID
         access-key-secret:  # Your AccessKey Secret
         sign-name:          # SMS signature
         template-code:      # SMS template code
-
Create an Alibaba Cloud account and activate SMS service
- Visit Alibaba Cloud SMS Console
- Activate SMS service
-
Create a signature (sign-name)
- Log in to SMS Console
- Select Domestic/International SMS service
- Go to "Signature Management" page and click "Add Signature"
- Fill in signature information and submit for review
- Wait for signature approval
-
Create a message template (template-code)
- Go to "Template Management" page
- Click "Add Template"
- Create a template with the following format:
Monitor: `instance`, Alert Level: `priority`. Content: `content`- Submit the template for review
-
Obtain Access Key credentials (access-key-id, access-key-secret)
tipAlibaba Cloud officially recommends using RAM user AccessKey with minimal permissions.
- Go to RAM Access Control to manage RAM users
- Create user and select "Access Key for API Access"
- Securely save the AccessKey ID and AccessKey Secret
- Grant SMS service permission "AliyunDysmsFullAccess" to the user
Now you can configure this information in your hertzbeat application.
UniSMS Configuration
UniSMS is an aggregated SMS service platform. You can refer to UniSMS Documentation for configuration.
Add/Fill in the following UniSMS configuration to application.yml (replace parameters with your own SMS server configuration):
alerter:
  sms:
    enable: true    # Whether to enable
    type: unisms   # SMS provider type, set to unisms
    unisms:        # UniSMS configuration
       # auth-mode: simple or hmac
       auth-mode: simple
       access-key-id: YOUR_ACCESS_KEY_ID
       # hmac mode need to fill in access-key-secret
       access-key-secret: YOUR_ACCESS_KEY_SECRET
       signature: YOUR_SMS_SIGNATURE
       template-id: YOUR_TEMPLATE_ID
-
Register UniSMS account
- Visit UniSMS website
-
Create signature
- Log in to UniSMS Console
- Go to "SMS Filing - Signature Management" page
- Click "Add Signature"
- Fill in signature information and submit for review
- Wait for signature approval
-
Create message template
- Go to "SMS Filing - Template Management" page
- Click "Add Template"
- Create a template with the following format:
Monitor: {instance}, Alert Level: {priority}. Content: {content}- Submit the template for review
-
Obtain
access-key-idandaccess-key-secret- Log in to UniSMS Console
- Go to "Credential Management" page
- Get AccessKey ID and AccessKey Secret
- Securely save the AccessKey ID and AccessKey Secret
noteUniSMS provides two authentication methods for developers to choose from, which can be set in Console - Credential Management, with Simple Mode as default.
- Simple Mode [Default]: This mode only verifies AccessKey ID without request parameter signature, making it easier for developers to integrate quickly.
- HMAC Mode: This mode requires signing request parameters with AccessKey Secret to enhance the security and authenticity of requests.
Now you can configure this information in your hertzbeat application.
Smslocal SMS Configuration
SMSLocal is an all-in-one SMS service for businesses, with features like multi-way sending, strong security, and 24/7 support. You can refer to smslocal's Developer Documentation for configuration.
Add/Fill in the following Smslocal configuration to application.yml (replace parameters with your own SMS server configuration):
alerter:
  sms:
    enable: true    # Whether to enable
    type: smslocal   # SMS provider type, set to smslocal
    smslocal:        # Smslocal configuration
       api-key: YOUR_API_KEY_HERE
-
Register smslocal account
- Visit Smslocal Website
-
Obtain
api-key- Log in to Smslocal Api Access
- Go to "API Access" page
- Click the eye button
- Copy the displayed access key
- Then you can configure the
application.ymlfile
Now you can configure this information in your hertzbeat application.
AWS Cloud SMS Configuration
To activate and use the AWS Cloud SMS service, refer to the official AWS documentation: SMS Getting Started Guide
You can configure the AWS Cloud SMS service either through the graphical interface or in the application.yml file.
To use application.yml, add/fill in the following AWS Cloud SMS configuration (replace parameters with your own SMS server configuration):
alerter:
   sms:
      enable: true    # Whether to enable
      type: aws       # SMS provider type, supports "aws"
      aws:            # AWS Cloud SMS configuration
         access-key-id:      # Your AccessKey ID
         access-key-secret:  # Your AccessKey Secret
         region:             # Region Of Your AWS
-
Create an AWS Cloud account
- If you don’t already have an AWS account, sign up at AWS Cloud SMS Console
-
Obtain Access Key credentials (access-key-id, access-key-secret)
- Go to the AWS IAM (Identity and Access Management) Console.
- Create an IAM user with programmatic access and attach the necessary permissions.
- Retrieve your Access Key ID and Secret Access Key (You will need these for configuration).
-
Select a Specific AWS Region for SMS Messaging
- Choose a region that supports AWS End User Messaging (SMS Service).
- You can check the supported regions guide.
-
Move from the AWS SMS Sandbox to Production
- By default, AWS SMS operates in sandbox mode, which restricts SMS delivery to verified phone numbers. To send messages to any number, you must move your account to production mode. follow this guide
-
Verify Destination Phone Numbers (for Sandbox Mode)
- if you are still in sandbox mode, you can only send SMS messages to verified phone numbers. To add a verified number, follow this guide
- Note: You do not need to create an Origination Identity or Origination Simulator—just use the AWS CLI to add verified phone numbers.
The message template is fixed as follows: "Instance: , Priority: , Content: "
Now you can configure this information in your hertzbeat application.
Twilio SMS Configuration
To activate and use the Twilio SMS service, refer to the official Twilio documentation: SMS Getting Started Guide
You can configure the Twilio SMS service either through the graphical interface or in the application.yml file.
To use application.yml, add/fill in the following Twilio SMS configuration (replace parameters with your own SMS server configuration):
alerter:
      sms:
            enable: true # Whether to enable
            type: twilio # SMS provider type, supports "twilio"
            twilio: # Twilio SMS configuration
                  account-sid: # Your Twilio Account SID
                  auth-token: # Your Twilio Auth Token
                  twilio-phone-number: # Your Twilio Phone Number
-
Create a Twilio account
- If you don't have a Twilio account, sign up at Twilio Console
- You'll get a free trial account that allows you to test the SMS service
-
Obtain Twilio credentials
- After signing in, locate your Account SID and Auth Token on the dashboard
- These credentials will be used to authenticate API requests
-
Get a Twilio Phone Number
- In the Twilio Console, navigate to "Phone Numbers" > "Manage" > "Active Numbers"
- Click "Buy a Number" or use the trial number provided by Twilio
- Make sure the number has SMS capabilities enabled
- This number will be used as the sender for your SMS alerts
- A phone number is required for the Twilio SMS service to work
-
Testing Your Configuration on Twilio
- Twilio provides a sandbox environment for testing
- If you are in the trial period, you will only be able to send SMS to verified phone numbers
- To verify a phone number, add it to your verified phone numbers list in the Twilio Console
The message follows the format: "Instance: , Priority: , Content: "
This information can be configured in the Hertzbeat application.
Operation steps
-
【Alarm notification】->【Add new recipient】 ->【Select SMS notification method】
-
Configure the associated alarm notification strategy⚠️ 【Add new notification strategy】-> 【Associate the recipient just set】-> 【Confirm】
Note⚠️ Adding a new recipient does not mean that it is effective to receive alarm information. It is also necessary to configure the associated alarm notification strategy, that is, to specify which messages are sent to which recipients.
If you have any issues, please provide feedback through the communication group or ISSUE!